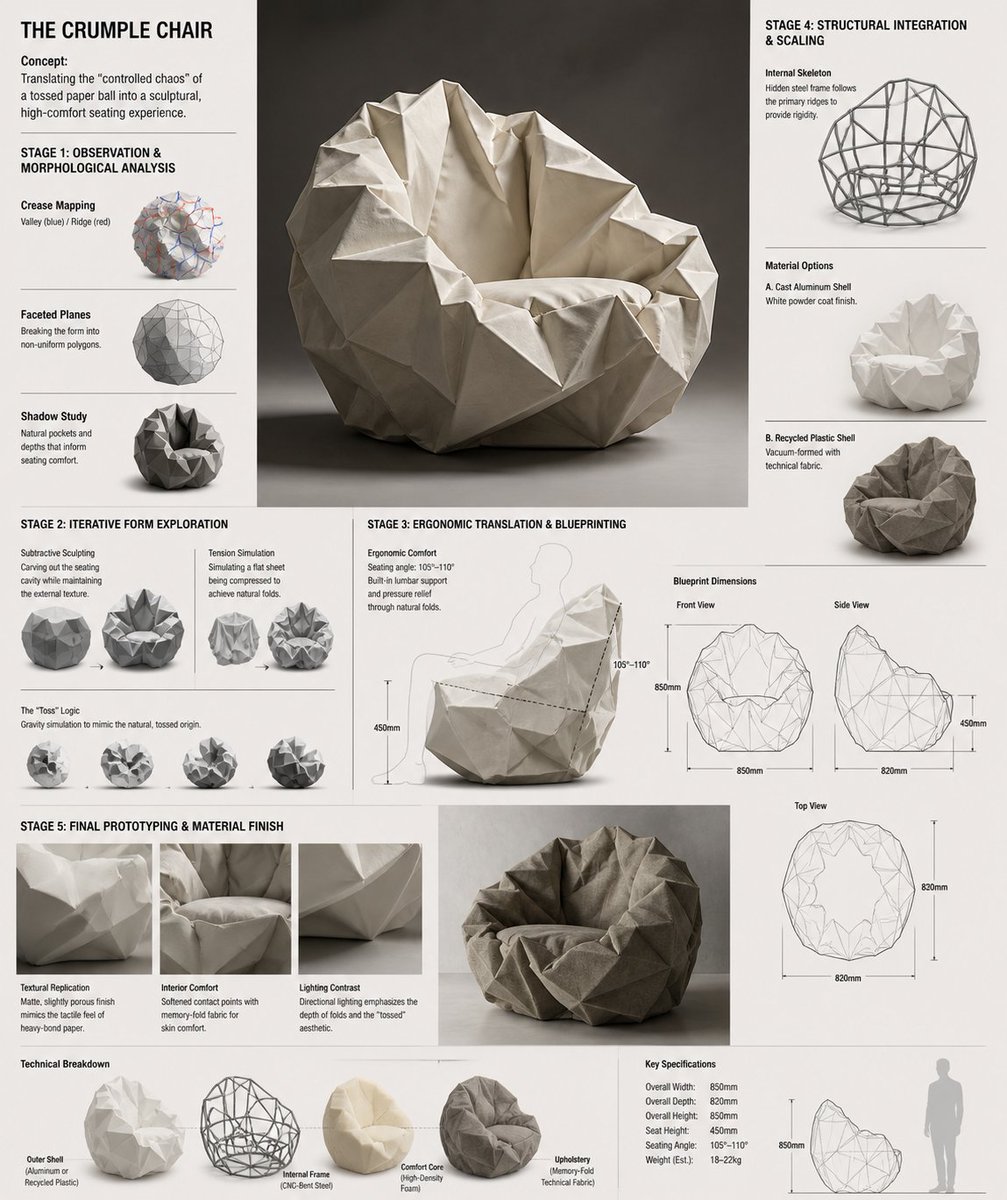
Crumple Paper Furniture Concept Design
An extensive architectural and product design prompt that translates the organic textures of crumpled paper into high-comfort sculptural furniture like chairs and sofas.
vistas1,400
me gusta63
comentarios32
compartidos4
guardados16
citas0
Design Concept: {argument name="furniture type" default="The Crumple Chair"} Core Philosophy: Translating the "controlled chaos" of a {argument name="inspiration" default="tossed paper ball"} into a sculptural, high-comfort seating experience.

Stage 1: Observation & Morphological Analysis The goal is to deconstruct the image of the crumpled paper into usable geometric data. Crease Mapping: Identify the primary "valley" and "ridge" lines. These represent potential structural ribs or seams in the chair. Faceted Planes: Break down the sphere into a series of non-uniform polygons. Each flat surface of the paper becomes a potential panel for the chair’s upholstery or shell. Shadow Study: Analyze how the "tossed" form creates deep recesses. These natural pockets guide where the user’s weight will be cradled.

Stage 2: Iterative Form Exploration Moving from a sphere to a seat through "Digital Crumpling." Subtractive Sculpting: Imagine the paper ball as a solid mass. Use Boolean operations to "carve out" a seating cavity that fits the human form while maintaining the external jagged texture. Tension Simulation: Use 3D software (like Rhino or Blender) to simulate a flat sheet of material being compressed. This ensures the folds look authentic and not "modeled." The "Toss" Logic: Experiment with gravity-based simulation dropping a digital mesh to see how it settles naturally, mimicking the "tossed" origin.

Stage 3: Ergonomic Translation & Blueprinting Refining the raw aesthetic into a functional object. The Comfort Core: Overlay a standard ergonomic template (Seating Angle: 105°–110°) over the crumpled form. Adjust the internal "folds" to provide lumbar support and pressure relief. Blueprint Generation: Create technical orthographic views (Front, Side, Top). Map out the dimensions: Seat Height: 450mm Total Width: 850mm Surface Smoothing: Maintain the sharp "paper edges" on the exterior shell while softening the interior contact points for skin comfort.

Stage 4: Structural Integration & Scaling Making the concept physically viable. The Skeleton: Design a hidden internal frame (likely CNC-bent steel rods or a 3D-printed lattice) that follows the most prominent ridges of the paper folds to provide rigidity. Material Selection: * Option A (High-End): {argument name="material" default="Faceted, cast aluminum"} with a white powder coat. Option B (Soft): Vacuum-formed recycled plastic shell covered in "memory-fold" technical fabric that retains a wrinkled appearance.

Stage 5: Final Prototyping & Material Finish Textural Replication: Apply a matte, slightly porous finish to the material to mimic the tactile feel of heavy-bond paper. Lighting Contrast: Use directional studio lighting in the final renders to emphasize the "tossed" shadows, making the chair look like a giant piece of discarded inspiration. Design Tip: To keep the "tossed" look authentic, avoid symmetry.


